
Creative Sound Blaster Omni Surround 5.1 USB Sound Card with 600ohm Headphone Amp and Integrated Microphone. External Box: Yes System Requirements: On PC platform Intel Core 2 Duo or AMD equivalent processor at 2.2 GHz Microsoft Windows 8 / Windows 7 / Windows Vista 1GB RAM 600MB free hard disk space CDROM / DVDROM drive USB 2.0 port On Mac Platform Intel Core 2 Duo 2.8GHz Mac OS 10.6 & above. (15) 15 product ratings - M-Audio Audiophile PCI 24/96 Sound Card (Includes breakout cable) $29.99. $14.90 shipping. Ending Jan 7 at 3:25PM PST 4d 17h.
Welcome to the Ultimate Super Mario Maker Modding Guide. This guide will teach you how to play and make mods for every entry in the Super Mario Maker series. Use the Table of Contents to navigate through the long list.This guide was made possible by all the folks over at the [Mario Making Mods discord server](https://discord.gg/TfU8jZA), including NightScript, MarioPossamotto, bunten, hus & GRAnimated.## Super Mario Maker (Wii U)### Playing Mods (Wii U Hardware)1. Download [SDCafiine](https://www.wiiubru.com/appstore/zips/SDcafiine.zip) and extract the contents of the archive to the root of your SD Card.2. Make a new folder on the root of your SD card called sdcafiine. Inside it create another folder and name it one of the respective title IDs. - **US**: `000500001018DC00` - **EU**: `000500001018DD00` - **JP**: `0005000E1018DB00`3. Inside the Title ID folder, make yet another new folder. Name this folder the folder of the mod.4. Make a folder called `content` inside it and extract the mod files into it. - If your mod comes with a `content` folder, place the file of that folder in the new `content` folder5. Boot the Homebrew Launcher using your preferred method, and then load SDCafiine. - In order to get the Homebrew Launcher, please follow [the Wii U hacking Guide](https://wiiu.hacks.guide/).6. Launch Super Mario Maker.### Playing Mods (CEMU)1. Open `cemu:/graphicspack` and create a new folder titled 'SuperMarioMaker_' and the name of the mod following, **without spaces**2. Create a file called `rules.txt` and copy the following inside (use any text editor to edit): ```ini [Definition] titleIds = 0x500001010ec00,0x5000e1010ed00,0x5000e1010eb00 version = 4 ```3. Add a new row to the file contents starting with `name = ` and then type the name of the mod, surrounded in double quotes4. Save the `rules.txt` file5. Create a new directory titled `content` and place the modified files there. - If your mod comes with a `content` folder, merge it with the newly created one6. The next time you launch CEMU, right click on your Super Mario Maker copy and hit 'Open Graphics Pack'.7. Go through the path made above and enable your mod.### Editing Sprites & Tilesets#### Instructions1. If you haven't gotten one already, please dump your copy of Super Mario Maker2. Download and extract the latest version of [Switch Toolbox](https://github.com/KillzXGaming/Switch-Toolbox/releases)3. If you're editing a sprite, open `StaticSkin.pack` in Switch Toolbox - Here's a documentation of all the SZS files in [StaticSkin.pack](https://pastebin.com/hZmD8WUs)4. Within Switch Toolbox, open the SZS file you'd like to edit.5. Inside the SZS file, open `output.bfres`.6. In the textures folder, you should see one or more images. Open the texture you'd like to edit.7. On the toolbar on the top, hit 'Edit' and hit 'With External Program'. - Make your edits to the textures. You could use any image editor, but we recommend [Paint.NET](https://www.getpaint.net/).8. Hit `CTRL + S` to save the image.### Editing Music#### Tools you will need- [Audacity](https://www.audacityteam.org/download/)- [Citric Composer](https://gota7.github.io/Citric-Composer/)#### Creating a Single-Channeled BFSTM1. Create a stereo music file in Audacity and export it as a .wav. 2. Inside Citric Composer, go to 'Tools' and launch 'Isabelle Sound Editor'.3. In the Sound Editor, go to 'Edit', and click on 'Import File'. * At this point, this is how it should look now: 4. If you want your music to loop, check the loop checkbox, then set the loop start and loop end in samples.  * If it's too difficult to do the above, you can set the loop start and loop end point in the track itself. * The yellow line is the loop start point. * The red line is the loop end point.5. Set the BFSTM version to `4.0.0`.6. Set the Output Encoding type to `DSP-ADPCM`.7. Click on 'Update Project Info'. * You can also save this as a project file8. Export your BFSTM by going to 'File' and clicking on 'Export Binary'.9. Save your file as 'Cafe Stream'#### Creating a Multi-Channeled BFSTMTo make multichanneled BFSTSMS, all you have to do is making the MONO channels.* To create a mono channel, go to 'Tracks' and click 'Add new'. SMW and NSMBU music have 4 channels:* First Channel: Main theme (Left)* Second Channel: Main theme (Right)* Third Channel: Yoshi Beat (Left) * Leave this blank if you do not want a Yoshi Beat. Do not remove this channel.* Fourth Channel: Yoshi Beat (Right) * Leave this blank if you do not want a Yoshi Beat. Do not remove this channel.* Make sure to correctly set the Left and Right channels, by using the slider on the left.1. Go to Edit -> 'Preferences...'2. In the 'Import/Export' tab, make sure to use a custom mix is set for 'When exporting tracks to an audio file'.3. Follow the Citric Composer steps in the Single Channeled BFSTM section.### Adding new backgrounds (to themes that don't have one)1. Make a copy of a background .szs file in that current directory2. Export the output.bfres file from the .szs using Switch Toolbox. * Right click `output.bfres` -> Archive -> Export Raw Data to File Location3. Launch a hex editor application and open the output.bfres file you just exported.4. Find every mention of the first two characters of the original file and replace them with any other two characters (except M1, M3, MW or WU).5. Save your BFRES file6. In Switch Toolbox, replace the output.bfres file in the new .szs with the new one you just edited * Right click `output.bfres` -> Archive -> Replace Raw Data7. At this point, make the edits to the background.8. Rename the `.szs` file to the name you game it in the hex editor.9. Within Switch Toolbox, open `/content/Static.pack`10. Search for a file called 'XX_SceneDB.byaml' (XX being your game style) and open it.11. On the top bar, switch to the 'Text Editor' tab.12. Decompile the byaml file into a editable xml format.13. Let's say I want to change the underground background. Where it says `
?????`, replace ????? with the name of your szs file. (????? can be M0_DV_black, MW_DV_plain, etc.)14. Compile the xml back into a byaml, and then save the edits by hitting the button on the bottom right.15. Save your Static.Pack file.### Editing Levels#### Requirements- A PC capable of running Python 3.5 - (Python 3.4 works but not recommended. For anything lower, uninstall other versions or at least remove them from PATH)- PyQt5 for your Python version and CPU: [32-bit for Python 3.5](https://sourceforge.net/projects/pyqt/files/PyQt5/PyQt-5.6/PyQt5-5.6-gpl-Py3.5-Qt5.6.0-x32-2.exe/download) -- [64-bit for Python 3.5](https://sourceforge.net/projects/pyqt/files/PyQt5/PyQt-5.6/PyQt5-5.6-gpl-Py3.5-Qt5.6.0-x64-2.exe/download)- The latest codebase of [PointlessMaker](https://github.com/aboood40091/PointlessMaker/archive/master.zip)- Your tilesets in PNG form- Your extracted course - You can use [saveMii](https://github.com/GabyPCgeeK/savemii/releases/latest) to export your course (as well as import it once you're done)#### Instructions1. Extract the `PointlessMaker-master.zip` archive somewhere.2. Place all your tileset images in the `PointlessMaker-master/tilesets/` folder3. Double-click the `main.py` excutable or open a terminal window in the PointlessMaker folder, and enter the following: `python main.py`### Memory Modding (Credits to Psycrow)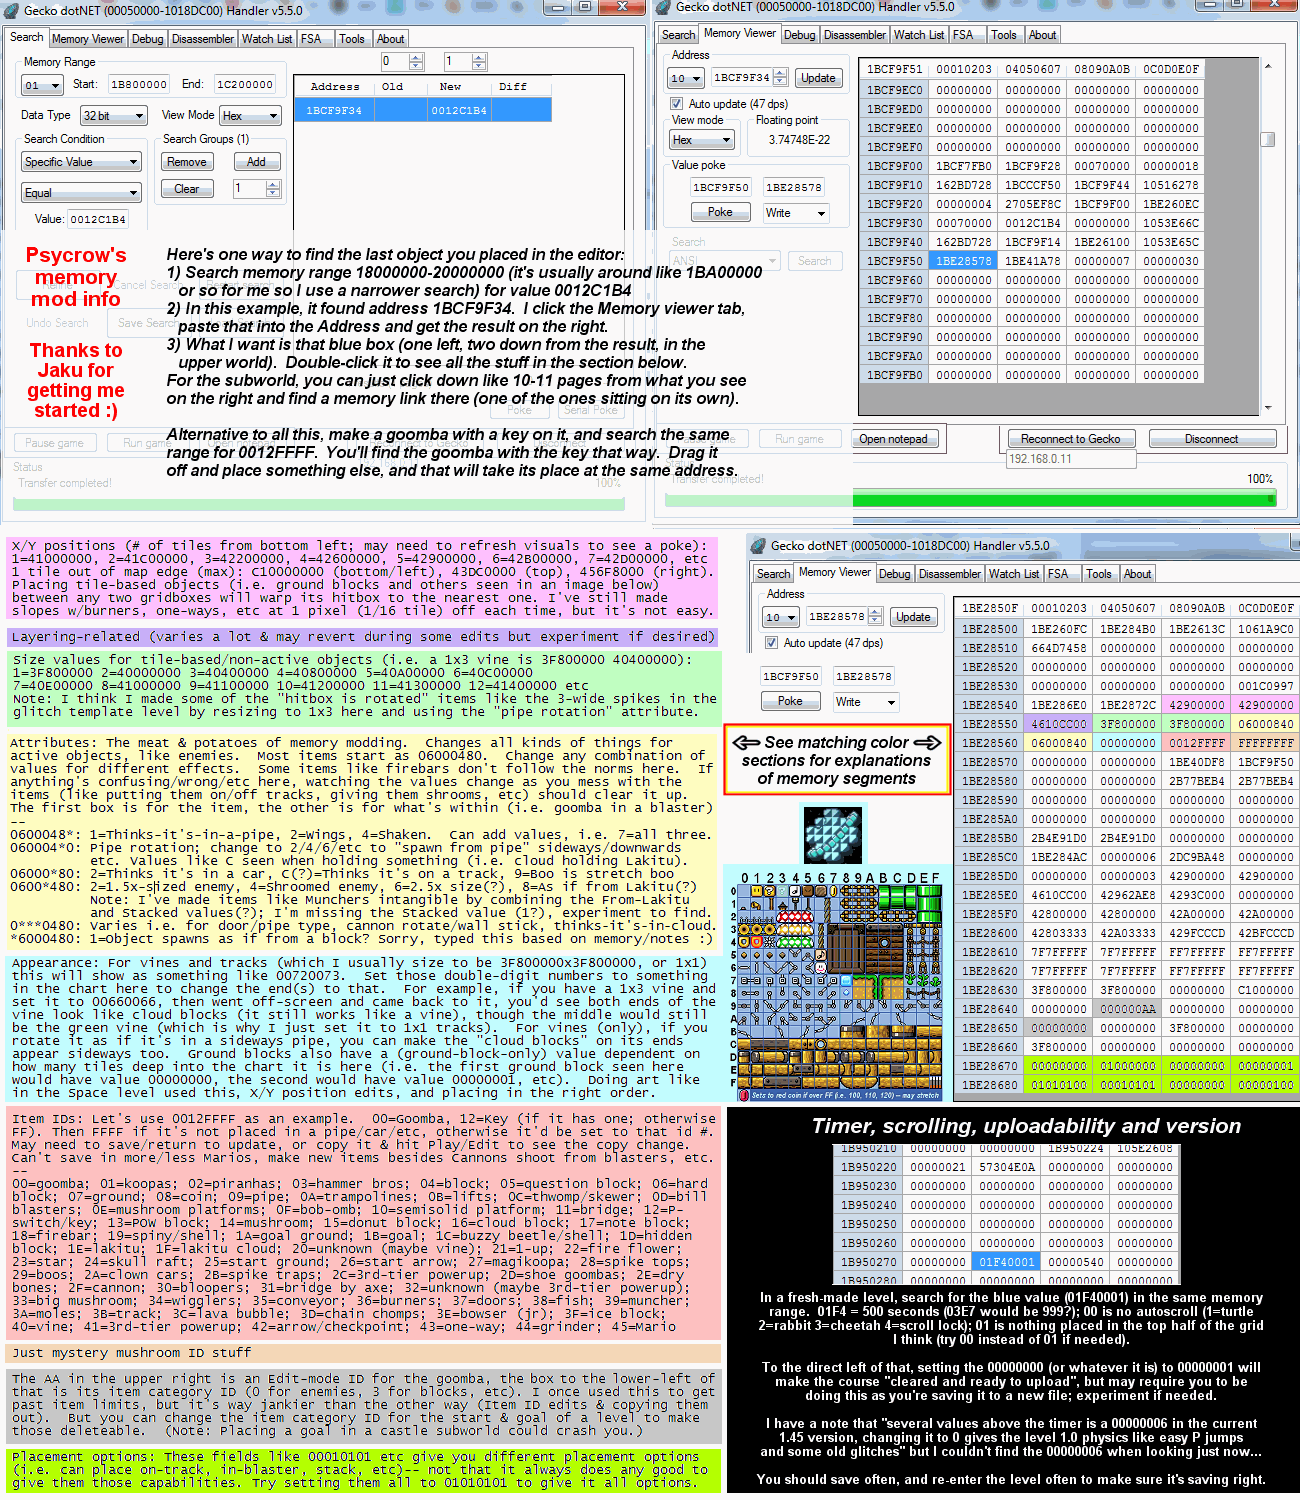### Custom ClapboardThis is a tutorial on how to make your own custom Super Mario Maker clapperboards. #### Requirements- An image editing program- Layout.pack (Located inside your Pack folder)- Images that you want to replace the clapperboard with- [Wexos Toolbox](http://wiki.tockdom.com/wiki/Wexos%27s_Toolbox) (Download on the right-hand side)- [Switch Toolbox](https://github.com/KillzXGaming/Switch-Toolbox/releases)#### Instructions1. Open `Layout.pack` with Wexos Toolbox2. Search for `Layout/Cmn_ClapperboardBtn_00.szs` - `Edit` on the Toolbar => `Search` => Type the above => `OK`3. Right-click the file and press `Export`4. Navigate to where you want to save your file. - NOTE: Before you press 'Save', find the 'File name' on the save window, & delete 'Layout/' from the name. Wexos will **not** let you save until you do this.5. Open the exported file & export the `.arc` file.6. Open the exported `.arc` file and export the following files: - `timg/KachinkoAO_00^t.bflim` - `timg/KachinkoBeauty_00^t.bflim` - `timg/KachinkoAO_01^t.bflim` - `timg/KachinkoBeauty_01^t.bflim` AO = Ambient Occlusion (Tells the file which parts are light, and which parts are dark. (Like the Edges)) Beauty = The Base Color Maps7. Open `KachinkoAO_00^t.bflim` with Switch Toolbox, you should see this: 8. Press `File` then `Export` on the Top, Left-Hand corner of the window. - NOTE: There are two `File`s in Switch Toolbox, press this one: 9. Save it as a PNG to wherever location you want - Make sure the ending of the filename is `.png` not `.bflim`10. Edit it with GIMP (Or any other image editing program) & make the entire image black. 11. Overwrite the image.12. Open `KachinkoBeauty_00^t.bflim` with Switch Toolbox & repeat step 8.13. Open the file with your image editing program & change it to look how you want it to. 14. Save the image then repeat steps 7 - 11 but with 'KachinkoAO_01^t.bflim'15. Repeat steps 12 - 13 but with 'KachinkoBeauty_01^t.bflim' 16. In Switch Toolbox open `KachinkoAO_00^t.bflim` & press 'File' then 'Replace'.17. Navigate to the PNG & double-click it. 18. Save it as the settings shown here: 19. Press 'OK', then 'File', 'Save' & Replace the original BFLIM.20. Repeat steps 16 - 19, but with 'KachinkoAO_01^t.bflim', 'KachinkoBeauty_00^t.bflim', & 'KachinkoBeauty_01^t.bflim'21. Replace all 4 BFLIM's in 'Cmn_ClapperboardBtn_00.arc' in Wexos Toolbox.22. In Wexos Toolbox, export 'blyt/Cmn_ClapperboardBtn_00.bflyt'23. Open the BFLYT in Wexos Toolbox & Delete 'P_PlateAO_00' & 'P_BarAO_00' (Right click, then Remove) 24. Save the BFLYT & Import into .arc25. Save `.arc`26. Replace `.arc` in `.szs`27. Save `.szs`28. Replace `.szs` in `Layout.pack` & Save `Layout.pack`Done! You have successfully made your own Clapperboard.### File System Documentation- Sample Courses can be found at `content:/Course/` - Thumbnails for these sample courses can be found at `content:/CourseThumbnail/` - Data for these sample courses can be found at `content/Pack/CourseData.pack`- The fonts are packed in the `szs` format and can found at `content:/Font` - `[game-style]_NumberFont.bffnt` - The font used for game styles HUD elements - `SpecialFont.bffnt`, `CountMario.bffnt`, `Block_NumberFont.bffnt` & `CountRanking.bffnt` - The Super Mario Maker Font - `MessageFont.bffnt` - Used for messages - `FontInfo.byml` - Has info telling the game what the font is and other info (to change definition)- The layouts are in the szs format and can be found at `content/Layout` (Most of the layouts here are unused) - `Boot_BootSceneXXX_00.szs` - Boot layouts for when you load into the game, depending on the day of the week. - `Cursor.szs` - Wiimote Cursor (Unused). - `E3_DebugMenuNormalBtn_00.szs` - Leftover button from the E3 2014 demo, back when the game was called Mario Maker. - `E3_DebugMenuSelectBtn_00.szs` - Leftover (selected) button from the E3 2014 demo, back when the game was called Mario Maker. - `image.jpg` - Image of Nikki from Swapnote (Leftover from SDK). - `ItemIcon_00.szs` - Early Splatoon Weapon design- Message files can be found at `content/Messages`- The `content/Model` folder contains backgrounds, tilsets and amiibo costumes - Tilesets follow a name structure of game style (M1/M3/MW/WU) + '_field_' + theme - Backgrounds follow a name structure of game style (M1/M3/MW/WU) + '_DV_' + theme- The `content/Pack` folder contains `.pack` files (a `.sarc` with a bunch of `.szs` files inside it) for a variety of things (springs, byamls, etc) - `Edit.pack` - Contains layouts and graphics for the editor - `Env.pack` - Lighting files - `Layout.pack` - Misc. layouts that aren't included in other packs (including Splatoon layouts) - `Lcl.pack` - Random Course World layouts. - `NormalPlay.pack` - Contains everything needed during playing a course, beating a course, the course splash screen, and the title screen. - `Nwk.pack` - Course World layout files. - `Sound.pack` - Contains sound effects and sounds pertaining to music files. - `Static.pack` - Pack containing Byaml (Enemy behaviors, tileset and background paths, etc..) files - `StaticSkin.pack` - Pack containing sprites.## Super Mario Maker for Nintendo 3DS### Playing Mods (Nintendo 3DS Hardware)1. Setup Luma3DS as your CFW of choice. - If you have not yet modded your 3DS, follow [3ds.hacks.guide](https://3ds.hacks.guide)2. On your SD card, place the modified files at `sdmc:/luma/titles/titleid/romfs`. The title ID used will depend on which version of Super Mario Maker you own. * **JP**: 00040000001A0300 * **US**: 00040000001A0400 * **EU**: 00040000001A05003. Compare your file browser to the following: 4. When you boot your Nintendo 3DS, hold SELECT.5. Be sure that 'Game Patching' is enabled.6. Hit START to save the modified configuration.7. Launch Super Mario Maker for Nintendo 3DS.### Playing Mods (Citra)1. Within Citra, right click 'Super Mario Maker for Nintendo 3DS' and hit 'Open Mod Location'2. In the window that just opened, make a new directory titled 'romfs'3. Place all the mod files inside.### Editing Sprites & Tilesets1. Dump your copy of Super Mario Maker for Nintendo 3DS. - [For game cartridges](https://3ds.hacks.guide/godmode9-usage.html#dumping-a-game-cartridge) - [For installed titles](https://3ds.hacks.guide/godmode9-usage.html#dumping-a-title)2. Download the latest release of [Kuriimu](https://github.com/IcySon55/Kuriimu/releases/latest)3. To edit sprites, launch `Karameru.exe`, select your `.bin` file and extract the `.ctpk` files from it.4. Launch `Kukkii.exe` and select your CTPK file5. Extract the textures and edit them using an image editor of your choice.6. Hit the save icon on the top.7. For editing sprites, launch `Karameru.exe`, select your `.bin` file and replace the `.ctpk` file inside the `.bin` file.### Editing Music#### Tools you will need- [Audacity](https://www.audacityteam.org/download/)- [Citric Composer](https://gota7.github.io/Citric-Composer/)#### Creating a Single-Channeled BCSTM1. Create a stereo music file in Audacity and export it as a .wav. 2. Inside Citric Composer, go to 'Tools' and launch 'Isabelle Sound Editor'.3. In the Sound Editor, go to 'Edit', and click on 'Import File'. * At this point, this is how it should look now: 4. If you want your music to loop, check the loop checkbox, then set the loop start and loop end in samples.  * If it's too difficult to do the above, you can set the loop start and loop end point in the track itself. * The yellow line is the loop start point. * The red line is the loop end point.5. Set the BCSTM version to `2.3.1`.6. Set the Output Encoding type to `DSP-ADPCM`.7. Click on 'Update Project Info'. * You can also save this as a project file8. Export your BFSTM by going to 'File' and clicking on 'Export Binary'.9. Save your file as 'CTR Stream'#### Creating a Multi-Channeled BCSTMTo make multichanneled BCSTSMS, all you have to do is making the MONO channels.* To create a mono channel, go to 'Tracks' and click 'Add new'. SMW and NSMBU music have 4 channels:* First Channel: Main theme (Left)* Second Channel: Main theme (Right)* Third Channel: Yoshi Beat (Left) * Leave this blank if you do not want a Yoshi Beat. Do not remove this channel.* Fourth Channel: Yoshi Beat (Right) * Leave this blank if you do not want a Yoshi Beat. Do not remove this channel.* Make sure to correctly set the Left and Right channels, by using the slider on the left.1. Go to Edit -> 'Preferences...'2. In the 'Import/Export' tab, make sure to use a custom mix is set for 'When exporting tracks to an audio file'.3. Follow the Citric Composer steps in the Single Channeled BCSTM section.### Filesystem Documentation- The UI code is written in Lua 5.0.3, and can be found here: `romfs:/UIX/Final/UIX/scripts` - The Lua basic functions were found by Sono and are [documented](https://pastebin.com/Gu4X7AsP)- Editor icons can be found at `romfs:/Palette/Icon/Textures`- BFRES files can be found at `romfs:/Mush/` - Use [Switch Toolbox](https://github.com/KillzXGaming/Switch-Toolbox/releases) to edit them- Enemy Parameters can be found at `romfs:/Parameters` - You could use any text editor to edit it.- Sprite models can be found here: `romfs:/Models/[game-style]_DV_[theme].szs`- Tileset Textures can be found here: `romfs:/Tiledata/[game-style]_field_[theme]_textures.ctpk`- Background Textures can be found here: `romfs:/Textures/[game-style]_dv_[theme]_textures.ctpk`- Messages are in the MSBT format and can be found here: `romfs:/MessagesC/[Region]/[Language]` - Use [Kuriimu.exe](https://github.com/IcySon55/Kuriimu/releases/latest) to edit them.- Fonts can be found over at `romfs:/Font`- Sound Effects can be found over at `romfs:/Sound/sound_data.bcsar`- Background Music can be found over at `romfs:/Sound/stream/[musicname].bcstm`- Sprites textures can be found over at `romfs:/A2D`- Layout Files can be found over at `romfs:/UIX/Final/UIX/Layouts/[layoutname].arc`- Lighting for the New Super Mario Bros. U game style can be found over at `romfs:/A3D`### Editing Levels#### Requirements- A PC capable of running Python 3.5 - (Python 3.4 works but not recommended. For anything lower, uninstall other versions or at least remove them from PATH)- PyQt5 for your Python version and CPU: [32-bit for Python 3.5](https://sourceforge.net/projects/pyqt/files/PyQt5/PyQt-5.6/PyQt5-5.6-gpl-Py3.5-Qt5.6.0-x32-2.exe/download) -- [64-bit for Python 3.5](https://sourceforge.net/projects/pyqt/files/PyQt5/PyQt-5.6/PyQt5-5.6-gpl-Py3.5-Qt5.6.0-x64-2.exe/download)- The latest codebase of [PointlessMaker](https://github.com/aboood40091/PointlessMaker/archive/master.zip)- Your tilesets in PNG form- Your extracted course - You can use [OCDM](https://puu.sh/Cmtk5/09c496d6b7.cia) to export your course (as well as import it once you're done)#### Instructions1. Extract the `PointlessMaker-master.zip` archive somewhere.2. Place all your tileset images in the `PointlessMaker-master/tilesets/` folder3. Double-click the main.py excutable or open a cmd window in the PointlessMaker-master/ folder, and enter the following: `python main.py`## Super Mario Maker 2 (Nintendo Switch)### Playing Mods (Nintendo Switch Hardware)1. Set up your switch for Custom Firmware with atmosphere. - If you have not done so already, follow [the Nintendo Homebrew guide](https://nh-server.github.io/switch-guide/).2. Create a folder titled `01009B90006DC000` at `sd:/atmosphere/contents/`.3. Place all your modified files there.4. Load up atmosphere and then launch Super Mario Maker 2!### Playing Mods (Yuzu)1. Within Yuzu, right click Super Mario Maker 2 and select 'Open Mod Data Location'.2. In the new folder that appeared, make a folder with the title of your mod.3. Inside the newly created folder, make another folder titled 'romfs'4. Place your modified files inside this romfs folder5. Within Yuzu, right click on the game and hit Properties6. Make sure your mod is enabled by hitting the checkbox.### Editing Sprites & Tilesets#### Instructions1. If you haven't gotten one already, please dump your copy of Super Mario Maker 22. Download and extract the latest version of [Switch Toolbox](https://github.com/KillzXGaming/Switch-Toolbox/releases)3. If you're editing a sprite, open `XX_Model.pack` in Switch Toolbox, where XX is the game style - Here's a documentation of all the ZS files in [StaticSkin.pack](https://pastebin.com/hZmD8WUs) (not updated for SMM2 yet)4. Within Switch Toolbox, open the ZS file you'd like to edit.5. Inside the ZS file, open `output.bfres`.6. In the textures folder, you should see one or more images. Open the texture you'd like to edit.7. On the toolbar on the top, hit 'Edit' and hit 'With External Program'. - Make your edits to the textures. You could use any image editor, but we recommend [Paint.NET](https://www.getpaint.net/).8. Hit `CTRL + S` to save the image.#### Notes- Tilesets & Backgrounds are in `romfs/model`- Tilesets follow a name structure like `M1_field_plain.Nin_NX_NVN.zs`- Backgrounds follow a name structure like `M1_DV_plain.Nin_NX_NVN.zs`- ZS files for sprites are in `romfs/Pack/XX_Model.pack/StaticSkin`, where XX is the game style### Editing MusicDifferent game styles have a different number of tracks and channels. Refer to this list to see how many tracks and channels the game style you're trying to edit has.
Number of Tracks
(Each Track contains 2 mono channels, left + right) | Where this plays |
|---|
7 tracks
14 mono channels | Edit Themes- Super Mario Bros. (M1)
- Super Mario Bros. 3 (M3)
- Super Mario World (MW)
- New Super Mario Bros. U (WU)
- Super Mario 3D World (3W)
|
1 track
2 mono channels | Play Themes- Super Mario Bros. (M1)
- Super Mario Bros. 3 (M3)
- Super Mario 3D World (3W)
|
2 tracks
4 mono channels
2nd track/3rd and 4th channels is for the Yoshi beats | Play Themes- Super Mario World (MW)
- New Super Mario Bros. U (WU)
|


1. Load up the music in [Audacity](https://www.audacityteam.org/download/).2. Refer to the table above for what to do based on the game style you're editing for - If the original `.bwav` uses 2 channels (has 1 track) add your music file to the current scene 1 time. - If the original `.bwav` uses 4 channels (has 2 tracks) add your music file to the current scene 2 times. - If the original `.bwav` uses 14 channels (has 7 tracks) add your music file to the current scene 7 times.3. Select each channel ('Select' -> 'All').4. Normalize every selected track to a dB of -16.0 ('Effect' -> 'Normalize')5. Set the 'Project Rate (Hz)' to 480006. Export your music as a 'WAV (Microsoft) signed 16-bit PCM' ('File' -> 'Export')7. Inside [Citric Composer](https://gota7.github.io/Citric-Composer/), launch 'Isabelle Sound Editor' ('Tools' -> 'Isabelle Sound Editor')8. Inside Isabelle Sound Editor, select the 'WAV (Microsoft) signed 16-bit PCM' file we created earlier from Audacity.9. Expand the 'Channels' tree, and make sure that the amount of channels that exist are correct to the number of channels that should exist.10. Check the loop checkbox, then copy the 'Loop Start' value replace the 'Original Loop Start' value with it.11. Set the BWAV version to `1.1.0`.12. Set the Output Encoding type to `DSP-ADPCM`.13. Click on 'Update Project Info'. - You can also save this as a project file14. Export your BWAV by going to 'File' and clicking on 'Export Binary'.15. Save your file as 'NX Stream'#### Making Prefetch Files 1. Drag your file onto [`BWAVPrefetchGen.exe`](https://github.com/Gota7/BWAV-Prefetch-Generator/releases/latest/download/BWAVPrefetchGen.exe) to create the prefetch file.2. Within [Switch Toolbox](https://github.com/KillzXGaming/Switch-Toolbox/releases), open the `romfs:/Pack/StaticHighFreqSound.pack` file.3. Dock the search list ('View' -> 'Dock Search List')4. Search for `CourseSceneBGM_XX.bars`, where XX is the game style (Refer to the table above)5. Expand the file, then search for the name of the original .bwav file.6. Right-click the file and press `Replace`, then choose the prefetch file.7. Hit `CTRL + S` to save the file.#### Creating Custom SFX Without Looping1. Open the converted `.bwav` in a hex editor. - We recommend using HxD.2. Move to the 0x4C offset in the `bwav`.3. Fill in 4 bytes with `FF`.### Editing mRideCloudScale & mRideClownScale For Enemies, Items & Objects
| Node | What it represents | Value Explainations + Options |
|---|
| 1b7484e8 | mRideCloudScale | Changes the enemy scale when inserted into a Cloud
Default: 1.00000 |
| 543aade0 | mRideClownScale | Changes the enemy scale when inserted into a Clown Car
Default: 1.00000 |
| bc95a216 | mFlag | This changes the behavior of the enemy's texture when they collide with a wall:0 makes the enemy's texture flip when they collide with a wall1 makes the enemy's texture not flip when they collide with a wall
The default value depends on the enemy. |
1. Within [Switch Toolbox](https://github.com/KillzXGaming/Switch-Toolbox/releases), open the `romfs:/Pack/Static.pack` file.2. Dock the search list ('View' -> 'Dock Search List')3. Search for the file you want to edit (Example: `M1_Enemy_kutsu_kuriboA.byml`)4. Select the file, and you should see the contents appear in the `File Editor` display on the right of the window. - Here is an example of the decoded byml file `M1_Enemy_Kuribo.byml`: ```yaml Version: 4 IsBigEndian: False SupportPaths: False HasReferenceNodes: False root: !h dcbddcb8: !h 1b7484e8: 1.00000 !h 274c6a81: -21.00000 !h 293d2c07: false !h 46c0e8be: -34.00000 !h 543aade0: 1.00000 !h 5fa7149a: 8.00000 !h 6471ed6b: -8.00000 !h 7f5697d3: 1.00000 !h 910f99b: 1.00000 !h b896b6e2: !h 2da3d56b: {!h 1ed5694: 1.00000, !h 6404e56c: walk, !h 808d2d72: 1.00000} !h 2e7ecc8e: {!h 1ed5694: 1.00000, !h 6404e56c: swim, !h 808d2d72: 1.00000} !h b09697d: {!h 1ed5694: 1.00000, !h 6404e56c: kutsu, !h 808d2d72: 1.00000} !h b43cbec2: {!h 1ed5694: 1.00000, !h 6404e56c: edit_drag, !h 808d2d72: 1.00000} !h d675fc4d: {!h 1ed5694: 1.00000, !h 6404e56c: walk, !h 808d2d72: 1.00000} !h dc4fc3b0: {!h 1ed5694: 1.00000, !h 6404e56c: damage, !h 808d2d72: 1.00000} !h dddc2cdb: {!h 1ed5694: 1.00000, !h 6404e56c: walk, !h 808d2d72: 1.00000} !h bc95a216: !l 1 !h bdbeaf8d: 2.00000 !h db47d925: -24.00000 !h e534b05e: -36.00000 !h f677511e: -50.00000 !h fea17fb7: 8.00000 ```5. Expand the tree once and click the '`dcbddcb8 :
0`' node.6. Right-click on the node you want to edit, then click 'Edit'.7. Edit the value as you like, then hit Ok.8. Click the 'Save' button in the `File Editor` display to save the byml file, then hit `CTRL + S` to save the archive.## Old Wii U FS Doc(More detailed documentation coming soon.)CourseThumbnail - Contains the thumbnail files for the courses.Font - Contains the szs file that contains font files.M1_NumberFont.bffnt - SMB1 fontM3_NumberFont.bffnt - SMB3 fontMW_NumberFont.bffnt - SMW fontWU_NumberFont.bffnt - NSMBU fontSpecialFont.bffnt - SMM fontCountMario.bffnt - SMM font, again.Block_NumberFont.bffnt - SMM font, yet again. CountRanking.bffnt Yet another SMM font.MessageFont.bffnt - message font.FontInfo.byml - Has info telling the game what the font is and other info.Layout - Contains layout files. (Mainly unused, though.)Boot_BootSceneXXX_00.szs (XXX is Sun-Sat) - Boot layouts for when you load into the game. Cursor.szs - Wiimote cursor (Presumed to be unused) E3_DebugMenuNormalBtn_00.szs - Leftover button from the E3 2014 demo. E3_DebugMenuSelectBtn_00.szs - Leftover (selected) button from the E3 2014 demo. image.jpg - Leftover from SDK (Image of someone from Swapnote.) ItemIcon_00.szs - Early splatoon weapons (Almost every one of them have differences from their final version) LEnd_WorldClearTelop_00.szs - Likely unused and from E3 2014. If not, it's a layout for finishing the 10/100 Mario Challenge. LWM_PlayBtn_01.szs - A start button for the 10/100 Mario Challenge. LWM_WorldMap_00.szs - Used for the 10/100 Mario Challenge. LWM_WorldMapCastle_00.szs - Used for the 10/100 Mario Challenge. LWM_WorldMapCourse_00.szs - Used for the 10/100 Mario Challenge. LWM_WorldMapKuribo_00.szs - Used for the 10/100 Mario Challenge. LWM_WorldMapMario_00.szs - Used for the 10/100 Mario Challenge. MessageTest_00.szs - Leftover message (Likely from Splatoon, images aren't there however). MessageTest_01.szs - Leftover message (Likely from Splatoon, images aren't there however). PauseBtn_00.szs - Leftover pause button from Splatoon (Might be an early version). Test_ActorBtn_00.szs - Leftover asset from the E3 2014 demo. Test_PointGet_00.szs - Leftover asset for getting points/1 up from the E3 2014 demo.Message - Contains the message files.Model - Contains backgrounds, tilesets, and amiibo costumes.DV - BackgroundField - TilesetPack - Contains pack files with different types of files.CourseData - Contains info about the sample courses. Edit - Contains layouts and graphics for the editor. Env - Contains files related to lighting. Layout - Misc. layouts that aren't included in other packs (Some Splatoon layouts are in here!). Lcl - Random layouts for Course World. NormalPlay - Contains everything needed during playing a course, beating a course, the screen to get to the course, and the title screen. Nwk - Layout files for Course World. Sound - Contains sound effects and sounds pertaining to music files. Static - Contains byaml files. StaticSkin - Contains sprites for enemies, items, objects, and the player. System - Contains files related to interpreting shaders and layouts. (Possibly unused?) UI_Boot_Sound - Contains all the UI sounds (including the editor), boot sounds, and some course world sounds. FieldEnv_Normal - Contains blocks for the ground themes. FieldEnv_Dark - Contains blocks for the underground themes. FieldEnv_Water - Contains blocks for underwater themes. FieldEnv_Yogan - Contains blocks for castle themes. Sound - Contains music and amiibo costume SFX.(More detailed documentation coming soon.)Important Notes : _A means variation acc. to mega mario. _mega means the item has mushroom applied to it. _mini means if they have a smaller version (blooper,etc). _jr means essentially the same thing as _mini. _fire means it has fire flower applied to it. _D will be applied to the name if the item/enemy has an another variant.black = Black Tile tutorial = Tutorial BackgroundXX_Enemy :blackpakkun = Muncher bombhei = Bob-omb bros = Hammer Bros. bubble = Podoboo choropoo = Monty Mole dossun = Thwomp firepakkun = Venus Fire Trap fishbone = Fish Bone gesso = Blooper hanachan = Wiggler jugem = Lakitu kameck = Magikoopa karon = Dry Bones killer = Bullet Bill killer_houdai = Bill Blaster koopa = Bowser koopa_clown = Clown Car kuribo = Goomba kutsu_kuribo = Goomba's Shoe (A = Normal & B = Heel) met = Buzzy Beetle necchi = Stretch (Boo Appearing from the floor ) nokonoko = Koopa Troopa (A = Green & B = Red) paipo = Falling Spiny pakkun = Pirhana Plant poo = Rocky Wrench pukupuku = Cheep Cheep (A = Green & B = Red) senkan houdai = Cannon teresa = Boo togemet = Spiketop (A = Red & B = Blue) togezo = Spiny wanwan = Chain ChompXX_Item :Charakinoko = Mystery Mushroom kinoko = Mushroom flower = Fire Flower flower2 = Fire Flower & Mushroom kinokofunny = Weird Mushroom Mega kinoko = Classic Mega Mushroom Mega kinoko2 = Modern Mega Mushroom star = Super StarXX_Object_block :chikuwa = Donut Block hatena = Question Block kara = Used Question Block katai = Breakable Block kori = Ice Block kumo = Cloud Platform block_onpu = Note Block (White) pow = Pow Block renga = Brick Block toumei = Winged Invisible Block tuta = Vine emerging from blockXX_Object :burner = Burner coinrotate = Rotating Coins daikonbou = Skewer door = Door firebar = Firebar Block & Fireball Goalpole = Goal Pole hanatari = One Way Wall jumpstep = Springboard key = Key lift = Independent Platforms (Orange & Blue) {'_rail = On track' ; '_fall = falling'} liftyougan = Skull Platforms (1 = White ; 2 = Blue) magma = Castle Lava middleflag = Checkpoint ono = Ending Castle in Castle Theme peach = Princess Peach pswitch = P-Switch saw = Saw startblock = Temporary Editor Block Sprites tower = Ending Castle yajirushi = ArrowPlease note: This page is unfinished and still contains references to the Citra emulator and the Nintendo 3ds!
The User Directory
yuzu’s user directory is where the emulator persists the emulated Switchs NAND, save data, extra data, and a host of other files necessary for yuzu to run properly. The path of the user directory varies on different systems:
- on Windows, the path is
C:/Users/[your-user-name]/AppData/Roaming/yuzu/. Note that the folder AppData is hidden by default, so you need to change the configuration to view it.- in old version of yuzu, the user directory used to be the
user folder in the same directory as the yuzu executable.
- on macOS and Linux, the path is
~/.local/share/yuzu-emu/. Note that the folder .local is hidden on most machines, so you need to change the configuration to view it. Additionally, the config folder is located in ~/.config/yuzu-emu/.
There are at least three directories within the user directory: config, nand, and sdmc. For users that have dumped the shared fonts from a Switch console, there will also be a sysdata directory. See below for details about each directory and what data is stored within.
Sdmc Sound Cards & Media Devices Driver Download Windows 10
Diagram of yuzu’s User Directory
Dumping files from a Switch
Included in this guide are instructions on how to dump various files from a Switch console to put into the yuzu user directory. These files are optional in terms of yuzu’s ability to run, but depending on certain circumstances some may be required in order to run a particular game or get past a certain point in the game. In general, dumping files from a Switch will require an SD card reader or some way to use wireless file transfer from a Switch to a computer like the FTP System Module or the FTPd Homebrew and that the Switch being dumped from has Custom Firmware installed.Optionally, more advanced users can use HacDiskMount to access a NAND Backup instead of accessing the Switch directly.
If the below articles are too wordy, consult the below tutorials for obtaining optional files to improve the yuzu experience:
config
This directory contains files containing information that tell yuzu how to run. These files are in plain text and thus are fully editable and contain configurations for mapping controls, which [CPU]] and audio engine to use, rendering and other visual options, the [Log Filters, which region the emulated Switch belongs to, whether to treat the emulated Switch as a new Switch, and whether to insert a virtual SD card into the emulated system.
Changing these files is only to be done by advanced users because making changes at random can cause yuzu not to work as expected or at all. The yuzu executable has options menus that allow users to change most of the aforementioned configurations safely. If yuzu has trouble running after changing a file and the user cannot remember what they changed, delete the configuration files and run the executable again so that they are regenerated automatically (albeit as though yuzu is being run for the first time so any existing configurations are lost).
log
This directory contains yuzu_log.txt. This file is automatically generated by yuzu and stores the logging. It is overwritten every time yuzu is launched.
nand
This directory is the emulated Switch system NAND. It does not match an actual console’s NAND exactly due to differences between yuzu and a physical Switch. This directory will contain the data directory and potentially also the system archives.
data

This directory is automatically generated by yuzu and contains the system and extra data for the emulated NAND. Inside this directory is another directory, 00000000000000000000000000000000. On a physical Switch, the directory inside data would be named differently. Its name would be 32 characters long and made of hexadecimal characters (0-9 and A-F) instead of it being all 0’s like yuzu. This knowledge is only important if you plan on dumping any NAND system data or extra data from a physical Switch and associating it with yuzu. The 00000000000000000000000000000000 contains two folders, extdata, containing NAND extra data, and sysdata, containing NAND system save data.
sysdata
System save data is identified by a title ID, separated into TID High, the first 8 characters of the title ID, and TID Low, the last 8 characters of the title ID. Most system save data has a TID high of 00000000. An individual piece of system save data is stored in sysdata/[TID Low]/[TID High]. For details about the different kinds of system save data, see 3dbrew. For first-time yuzu users, there may be nothing inside the sysdata directory. In fact this will be the case for most yuzu users, and is nothing to be alarmed about. This data will be created automatically in some cases, such as when a Mii is saved in Mii Maker. Almost none of this data is essential for yuzu to run homebrew games or backups of licensed titles.
There is one notable exception to the last statement. yuzu requires a dump of a physical Switch’s config savegame in order to run a small number of games. Follow the instructions located at Dumping Config Savegame from a Switch Console to obtain the config savegame from a Switch console.
Other system save data aside from the config savegame can be dumped from a Switch console by an expert user and placed in the sysdata folder. At this time, though, many features that read from or write to system save data have not been implemented so there is currently little value in doing so. See this discussion topic for more details about dumping system save data.
Sdmc Sound Cards & Media Devices Driver Download 64-bit
extdata
NAND extra data always has a TID High of 00048000, so the extdata directory should contain a 00048000 folder, though it has been observed in yuzu that there may be a 00000000 folder instead, and users have reported issues if there is both a 00000000 and 00048000 folder contained therein, so it is advised to delete the 00000000 folder if that is the case. Inside the folder may be nothing, or it may contain one or more directories named F000000#, where # can be the characters A-F or the numbers 0-9. Each of these folders corresponds to a TID low, which can be used to identify the type of extra data stored therein. See 3dbrew for details about the different kinds of extra data stored in NAND.
At this point in time, it is possible to dump extra data from a physical Switch’s NAND using a save manager like JKSM and to place it in the extdata directory, but doing so is entirely optional and yuzu does not currently emulate NAND features that utilize most of this extra data.
system archives
This folder, named 00000000000000000000000000000000, will only exist if the system archives have been dumped from a physical Switch. The system archives are required for some games to work with yuzu. To obtain the system archives, follow the instructions located at Dumping System Archives and the Shared Fonts from a Switch Console.
sdmc
This directory is the equivalent of the SD card inserted into a physical Switch, which stores game save and extra data and any titles installed to the SD card in encrypted format, though yuzu does not currently emulate installing titles to SD and instead runs decrypted .Switch, .app, and .cxi files directly from the computer’s filesystem. Inside the sdmc folder, just like on a real Switch console, is a Nintendo Switch directory, which contains two more directories, Private and 00000000000000000000000000000000.
Private
The Private directory on a real Switch contains camera data (in 00020400/phtcache.bin) and sound data (in 00020500/voice/...). yuzu will create camera data while it is running. If a user wants to copy their camera and sound data to yuzu, they can do so easily by copying the Private folder from their SD card and overwriting yuzu’s, but at this time there is no value in doing so.
00000000000000000000000000000000
This directory contains another directory of the same name, and inside of that is where game saves (in the title directory) and extra data (in the extdata directory) can be found. On a real SD card, there would not be two 00000000000000000000000000000000 folders, but instead the folders would be named as hexadecimal characters corresponding to a Switch console ID. If a user wishes to extract save or extra data from their physical console, they do not need to worry about the console ID not matching yuzu’s 00000000000000000000000000000000 folders.
title
If any games have been saved while playing them with yuzu, there should be a folder inside sysdata named 00040000. This folder contains all of the save data for Switch titles. It is entirely possible to retrieve save data from an SD card using a physical Switch console and import it into yuzu to continue a game where it was last left off on the console. See [Dumping Save Data from a Switch Console]] for instructions. On a real SD card, the sysdata folder will also contain the files required to run any Switch titles installed to the SD card. This can be mimicked somewhat by [Dumping Installed Titles and importing them into yuzu’s sysdata directory but this is unnecessary since yuzu can run them from anywhere on a computer filesystem and doesn’t require the accompanying .tmd and .cmd files.

On a real SD card, there may be two other directories inside sysdata. These directories are named 0004000e and 0004008c and correspond to downloaded game updates and DLC respectively. The data contained within these directories can be backed up on a computer as decrypted CIA files and installed with yuzu (Dumping Updates and DLCs). The latest version of GodMode9 is required to redump your DLCs if you do not own all them as it was dumped incorrectly before.
extdata
This directory contains all of the extra data created when playing Switch game backups. yuzu emulates a console’s behavior of reading from and writing to extra data, so this data can be dumped from an SD card using a physical Switch console and imported into yuzu. See Dumping Extra Data from a Switch Console for instructions.
other folders
If a real SD card is compared to yuzu’s emulated SD card, yuzu may appear to be missing one or more folders present on the real SD card: dbs, backups, and Nintendo DSiWare. The dbs folder contains a Switch console’s title database. The backups folder contains saved data backed up via the Home Menu. The Nintendo DSiWare folder contains exported DSi exports. yuzu does not need any of these folders so there is currently no value in dumping them.
sysdata
Sdmc Sound Cards & Media Devices Driver Downloads
This directory can contain two files.

Sdmc Sound Cards & Media Devices Driver Download
shared_font.bin: this was a legacy system font data dumped from old versions of Switchutils and is no longer supported. If the user does not have shared font installed, yuzu will use the open source font replacement instead. Users should redump their shared font since the open source font replacement may not always look accurate. See Dumping System Archives and the Shared Fonts from a Switch Console for more information.
aes_keys.txt: this file is reserved for future use to hold decryption keys.


